Showing posts with label holidays. Show all posts

Saturday, November 21, 2020

Thankful, Grateful, Blessed

 Hello and Happy Saturday Everyone!
I know it's been a couple of weeks since I posted last -
We have been plugging away and getting the kitchen done -

I really wanted to have it done by Thanksgiving and we are
so Dang Close I can taste it! YAY!
Of course, as with anything we've been doing on this
house we've run into snags here and there -

We have a small section left in the kitchen which should
be completed by this weekend (keeping fingers crossed)

On another good note, my back is so much better, 
but now this past week I've caught a bug!
I've been a bit down and out not able to do too much
around the house -- But as I'm typing this out I am feeling a lot better
than those first few days of catching whatever it was I caught! LOL

I've only had time to create 1 card so I thought I would share it before
November left us behind - :)

It also looks as though I won't get my house completed by the
end of the year deadline we had set for ourselves - I'm coming to terms
with it and will take whatever I can out of it now - My son will
leave after the holidays so whatever is done by that time is what
I'll have to live with and work on the rest of the house
without his help moving forward - 

It'll all work out I'm sure in the end and I can honestly
say I'm totally happy with all the work we've put into this place so far -

I'm super grateful for him and all the hard work
he helped put into this place for us - I'm one lucky MOM!

Anywho - Let me share the card I made using
a beautiful Leaf Stencil from Polka Dot Orchard


I swear if I had more time on my hands I would have totally made 
several more cards with this beautiful stencil - 
I just LOVE it!


I Foiled my card with Copper foiling! I had to take another picture to
see if I could capture it - it looks so pretty
up close and in person!


I tried several times to take a picture showing off the inside as well - 
All Copper foiling inside too... this really is an elegant card! 


Here's what I used on this lovely card -


Copper Foiling, Laser Printer, Laminator,
Fun Foam, Stitched Rectangle Frame Die, Neenah Solar
White Cardstock, Dark Chocolate Cardstock, Distress Oxides in
Spiced Marmalade, Ripe Persimmon, & Fire Brick


Thanks for stopping by!
Have a Beautiful Thanksgiving Week!

Theresa

Wednesday, October 28, 2020

Spooktacular Slim Line Card

 Hello & Happy Wednesday Everyone!
I hope your week is moving along quickly -
I've got another pre-scheduled post to share -
and it's another Halloween card! YAY!

I actually made this card months ago...
Like before I moved! LOL
Hey, sometimes you just want to make a Halloween card in April!


This was the 1st Slim Line card I made back in April
with some new Slim Line dies (at the time) from Trinity Stamps

The designer paper was from a paper kit (WeR Memory - Retro Glam Kit)
 I had and shared several other projects from - I thought the colors were perfect for Halloween cards so I ended up making 2 different ones - 
I'll share the other one tomorrow! :)

The images & Sentiment are from Pink and Main (Spooktacular)
 and I've had them colored up
for a while sitting in one of my craft bags - I watercolored the
images with my Zig real brush pens & Bristol Cardstock
I used my Brother Scan N Cut to cut out the images

I added some assorted gems from my stash

I think it turned out so cute!

See Ya Tomorrow!
Have a BEAUTIFUL DAY!!

Theresa

Tuesday, October 27, 2020

Best Witches....2020

 Hello & Happy Tuesday Everyone!
I'm back with another pre-scheduled Halloween Post!

Yesterday I shared a card I made using products
from my good friend Jessica over at
and today I have another one I made using
more of her products -

She really has come a long way with her digital designs and
has embraced the crafting community with more
than just digital stamps! I love seeing her shop grow with
so many different designs and products for everyone to use -
Okay... I'll stop gushing over how proud I am of her and share
what I made - :)


YUP! I Foiled Again!!! You guys know I LOVE foiling!


And this is what the inside of my card looks like -
So perfect to send to a crafty friend for Halloween
OR in my case a little after Halloween since I'm
so behind on life right now! :)


Here's how I made it ---

(Boots & Sentiments) Best-Witches Digital Stamp Set - Polka Dot Orchard
(Web Stencil) Tangled Web Square Stencil - Polka Dot Orchard

Black Foil, Laser Printer, Laminator, Fun Foam, Masking Tape
Cardstock - Neenah Solar White, Black Papertrey Ink
Stampin' Blends Markers
Distress Oxides - Dried Marigold, Carved Pumpkin
Stitched Rectangle Frame Die, Oval Circle Die


See ya Tomorrow!
Have a BEAUTIFUL DAY!!!

Theresa

Monday, October 26, 2020

Witchy Hat Slim Line

 Hello And Happy Monday Everyone!
I hope you had a lovely weekend and 
the day has started in the right direction!

I'm sharing another quick post with you 
This time I'm changing it up and sharing a card 
I made about a week and a half ago -

My friend Jessica over at Polka Dot Orchard
has been doing amazing things over at her store
and I wanted to show you this fun card I made using
her brand new Stencils! 


Can you tell I used Foil? Yup... I Did! :)


Here's the inside of my card all foiled up as well ---


Here's what I used to make my card ----

(Web Design) - Tangled web-slimline stencil - Polka Dot Orchard
(Witch Hat) - Best Witches Digital Stamp Set - Polka Dot Orchard
(Sentiment) - Cats and Magical Hats Digital Stamp Set - Polka Dot Orchard

Laser Printer, Laminator, Purple & Black Foil
Distress Oxides - Carving Pumpkin, Forest Moss, & Black Soot
Stampin' Blends Markers - To color my witch Hat
Stitched Slim Line Die
Fun Foam for added dimension
Cardstock - Neenah Solar White, Black Papertrey ink, Purple Bazzill


See ya tomorrow!!! 
Have a BEAUTIFUL DAY!!

Theresa

Sunday, October 25, 2020

Jack O Lantern Decor'

 Happy Sunday Everyone!
I hope this post finds you all well!

I'm gonna try and make this a quick post and
it has been pre-scheduled because as I said yesterday
my time is very limited - :)

Here's another Fun Halloween Makeover
of a $ store sign - 


Here's how I made it ---

1.) I Sanded the entire front of the original design and
peeled off whatever was there
2.) I painted it with some white primer
3.) I used some painters tape to separate 
the pumpkin shape from the lower portion
4.) Then I painted the pumpkin portion and sides with some 
orange acrylic paint
5.) I went back over the pumpkin with one or two shades
of a tan paint just to add some dimension
6.) I painted the lower portion with some black glitter acrylic paint
7.)  Then I dry brushed on some white paint to give it a spooky feel
8.) I painted on some Mod Podge and let it dry
9.) I went into my Silhouette program and picked out
a pumpkin face and cut it out with some black vinyl
10.) Found a Sentiment it the Silhouette and edited it a 
little bit to fit on my sign then cut out the different words
with assorted vinyl colors
11.) I used some Spider dies from My Creative Time and die cut
them out with white vinyl
12.) Then I went back in with some Papertrey Ink Twine
and twisted it around the lower portion of the pumpkin and tied a bow. 

It looks cool on my shelf in the living room!

Have a BEAUTIFUL DAY!!!

Theresa

Saturday, October 24, 2020

Home Decor' Remake Project...

 Happy Saturday Crafty Friends! 
How has your week gone? how bout' the weekend so far?
Mine? busy, busy... So busy that I hurt my lower back!
It's been a while since I did that... I believe the last time was
back in Dec. 2019 - Soooo it was bound to happen sooner or later -

We are still chugging along with the kitchen but I'm taking it easy
this weekend because of my lower back pain, so I thought I
would sit down and write out a few posts-

You guys know I love Fall and Halloween and I've only shared one
thing so far... I did make a couple of things for the Fall season -
I even took some time to actually make 3 Cards -
I haven't made a card since March? maybe April?

So, I'm hoping to share them this next week - 
I think I'm just gonna make a quick post every day til
Halloween so you can see what I've been up to
 since getting a small craft space started -

I can't even be online more than once a week, so I apologize
now that I still haven't been able to get to most of your blogs - 
I think I got on Facebook once... it's just hard and time-consuming
and the house IS consuming my life more than anything else at the moment. :) 


So... here is another home decor project I did -
I got this sign from a teacher at my old job -


She was going to toss it out but when I saw
it, I told her what I see in the shape, and she
said go ahead and take it - just let me see what
you did when you finish it -


Well... here's what I did with it!


Isn't he the cutest? OMGOSH...
I think this turned out adorable and it's sitting by my front entry -

And YES! I did send her the pictures and she loved it! :)


What I did -----

1.) I sanded the sign down
2.) I painted it with a white primer
3.) I painted it with 2 shades of greens (acrylic paint)
4.) I dry brushed the edges and lines with a grey acrylic paint
5.) I painted my canvas with Mod Podge and let dry
6.) Went into my Silhouette program and found 2
different images and took parts from both to create this guy
7.) I picked out a few assorted colors of vinyl & cut out the pieces
8.)  Layered all the vinyl cuts on my sign to create this adorable Frankie!

When my sister came over she couldn't believe how cute
he turned out and I was like... I know... Right? I so love him!


Anyway... That's what I got for now!

Have a BEAUTIFUL DAY!!

Theresa

Thursday, March 12, 2020

Golden Christmas....

Hello & Happy Thursday Everyone!
I told you the other day that I got a new printer and
today is going to be another image from the Silhouette Store
that I thought should be tested out -

Of course, this card will be going right into 
my Christmas Stash for 2020!


The design from the Silhouette Store is (#236098)
The Stitched Rectangle Frame die is from (MCT)
The gold metallic Paper is from (Making Memories)
I used Fun Foam for added dimension
The White Cardbase is Neenah Smooth Solar White
And the White Card Front  (where my image is) 
is Smooth White Bazzill Cardstock


Here's another photo of it - I was trying to show the
Clear Wink of Stella Glitter pen on the wreath &
Merry Christmas - I love that I don't have to spray
my images now! Yay Me!!! 


Have a FANTASTIC DAY!!!


Theresa

Wednesday, March 4, 2020

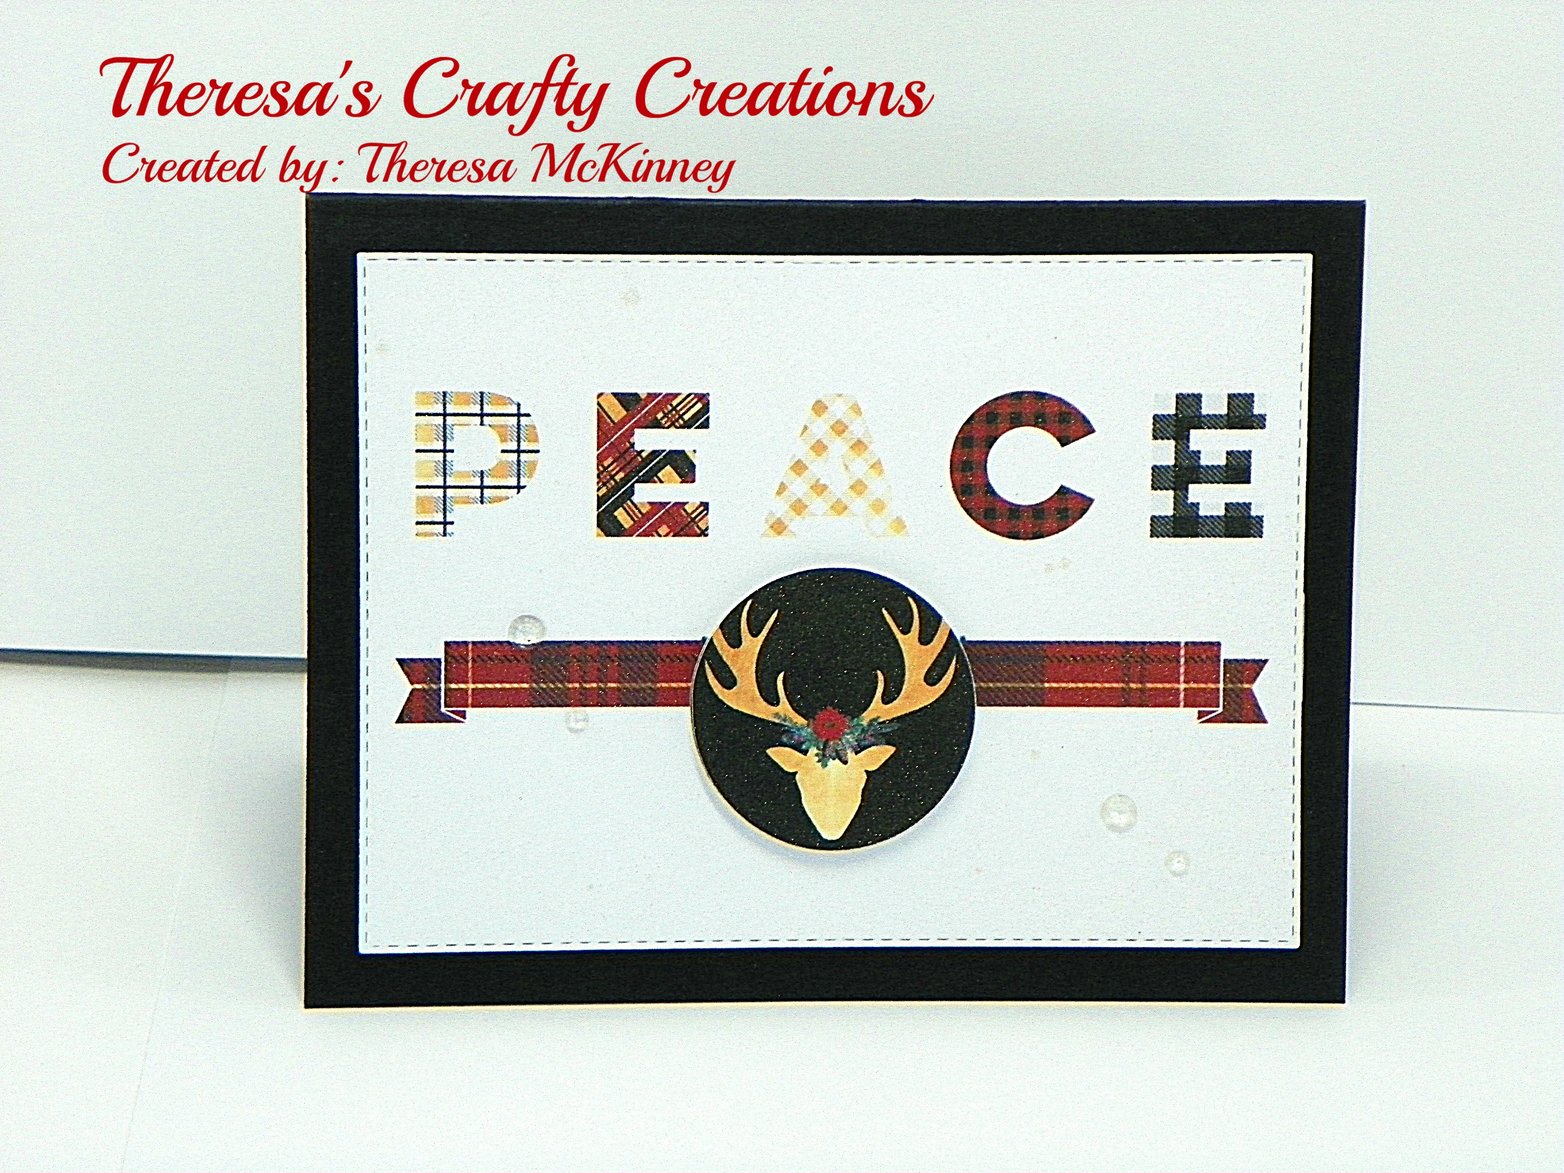
Peace

Hello & Happy Wednesday Crafty Friends!
Are you guys ready for Spring yet??
I know I am! It's supposed to be in the '70s for the 
rest of the week! I can't wait! EEK!

I thought I would pop in with another
Holiday card! I made 2 and they were super quick
and easy to create in my Silhouette Program -


I actually made these a while ago - way before my printer died on me!
I'm still so sad about it! I miss my Canon pro 9000 printer! (Inserting Sad Face)


So, I basically took some different images from the Silhouette store that
went together and designed this on my card front - I Popped
up the Stag image and I sprayed my card front with some
Sparkle Shimmer Mist spray - along with adding some clear lucy's cards gems 

(Silhouette Store)

Peace - 282157
Plaid Banner - 282158
Reindeer - 238408


The same thing goes for this card... I shrunk down the peace sentiment and
enlarged that beautiful poinsettia image - I sprayed the card front with the
Shimmer Mist and added some clear gems as well -

Both cards were popped up with Fun Foam and I used 2 different
Stitched Frame dies from MCT

(Silhouette Store)

Poinsettia - 282161
Inside Sentiment for both cards - 280688

Monday, February 24, 2020

Silent Night...

Hello and Happy Monday Everyone!
Have you ever just NOT felt like Crafting? 

Well, that's been me all week...
 I've been checking out your blogs to try
and get inspiration... and you guys
are really rockin' some awesome designs
and yet I still feel like Naaawwww... 😌

When we returned from our trip
back from the other house is when 
it started... I mean, everything over there
is getting done slowly, but still getting done...
Then I come back home only to sit here
doing nothing... GRRR!

I don't know if it's the stress of everything or what?
I did make myself do some crafting yesterday -
I have some old card kits still in their packages and
thought maybe I should try that! So, that's
exactly what I did... I followed a couple of cards
before I finally made some designs without
looking at the ideas they had - I ended up
making about 8 cards with at least 2 more left to do -

I think I'm gonna try a few more of the kits in
hopes it'll get me motivated... We shall see...

In the meantime here's a holiday card I made 
a while ago using foil! Yup... I still have several
projects sitting here complete with foil on them!! 


The images, Sentiments are from the Silhouette Store
I used my laser printer to print them out


I used deco foil on both cards and put them through my Laminator


I used Stitched Rectangle frame dies from My Creative Time,
and Fun Foam for added dimension
The blue and Gold Metallic Cardstock is from Making Memories


This is what the inside sentiment looks like, the sentiment
is also from the Silhouette store - I did one in the gold and the other
in blue to match up with the fronts of the cards - 

They both look so elegant and I can't wait to send them out for Christmas!


If you guys have any Mojo vibes you'd like to
share... please send them my way! 😁


Have a Beautiful Day!!

Theresa

Wednesday, February 12, 2020

Second Foil Quill Post...

Happy Wednesday Everyone! I'm back with
another Foil Quill Project! I really hope you guys
don't mind all the foil cards I've been sharing...
I really enjoy playing with all the different ways
you can add elegance to your card projects
and foils are definitely up there! :)

So, there are 2 cards and they are Christmas cards!


As you know I just got the Foil Quill kit and I bought extra Foil Quill colors at
my local Tuesday Morning, so I thought it would be fun to try using different foiled
colors on a card! When I use my Laser Printer and heat foil with
my laminator, it's really hard to get different colors - especially this close together
on a project - So having the foil quill really does help with those types of details!


I started out by finding an image in the Silhouette store (#208106)
I chose to use the BOLD PEN Tip this time and I had to
go to Sketch and enlarge my image then fill it in with the
checkered pattern again, then I used the .05 spacing and then
shrunk it down to fit on a card front -

What that does is "fill inside" the outline -
Most SVG's have an outline, and if you want to "color"
the inside with foil, you need to use the Sketch fill first
otherwise, it won't color inside - 
Here's a Youtube video showing someone using this technique
with the Foil Quill - Solid Fill


I used the Red foil first and it did the 2 trees and the 1 swirl, then when it was done
I used the Gold Foil which did 3 trees then I removed it and
then I used the Green foil to finish off the last 3 trees and swirl

I made 2 of them at the same time, so it took a while to create them -
Your machine is doing all the work and getting all the details
into each image - So you need to have patience which I don't
always have but watching this work flawlessly on
both cards made me very happy - It was only my second try
using the Foil quill - I could never get this foiled with all
3 colors with my laser printer and heat foiling, so you can
imagine the massive details having the quill can provide - 

I used Neenah Solar White Cardstock, Making Memories Gold & Red Cardstock,
MCT Stitched Rectangle Frame dies, The Sentiment is from MFT,
and I used Fun Foam for added dimension


Have a BEAUTIFUL DAY!!

Theresa

Friday, February 7, 2020

Christmas Magic...

Hello & Happy Friday Crafty peeps!!
It's the weekend again! YESSS!!!

One week left till Valentine's day!
Do you guys do anything for Valentine's day?
Me? NOPE! 
I mean I always do something for my family as a whole! 
I tend to make a shrimp & lobster feast -
Shrimp & lobster is so cheap during this time, so I
buy it and make them a nice meal with it -
But I don't go all out for my hubby or anyone like that...

I can tell him I love him whenever the heck I want!
I don't need a special day for that! hahaha

Anywho - I'm jumping holidays and sharing another
Christmas Card I made! tehehehe


2 weeks ago I showed you these snowmen cards right HERE
and while I was making them I decided to make a Santa one as well!

The Santa die is from SSS
The paper is a 6x6 pad in my stash
the elegant stitching die is from Penny Black
And I'm not sure who the sentiment is from -
I didn't write anything down and I'm not about to go
through my very LARGE Christmas Stamp stash! 😁
I used some black glitter cardstock for Santa's belt and
a piece of gold shimmer cardstock on it as well 


Wishing you all a Beautiful Weekend!!!

Theresa

Friday, January 31, 2020

Acetate Xmas Trees...

Hello and Happy Last day of January Everyone!!
Well, we ALL made it through our first month of the New Year! YAY
Before you know it, Spring will be here! YYAASSSS!!! 😊

I've got a Christmas card to show ya using foil -


I bought those Acetate Toner sheets from Deco foil (awhile ago) and had these all
foiled up in assorted colors of course - Since I only got this one
completed, I thought I would show it - 

I have to say I'm a little disappointed in the PEARL FOIL -
That is what I used on those trees - now up close and in person 
you can see the foil, but other than that, it looks like I've got
black silhouette trees (nothing wrong with that) but that
wasn't what I was going for! LOL

I colored the backside of the acetate to add some color to the
trees and that turned out cute - but I gotta say I love the
other colors I got on my other trees - I just need to turn them
into cards first before sharing! 😁

The toner sheets are great for those of you who don't have a laser printer
And the acetate ones are just fun for trying something different!
They ALL HEAT FOIL BEAUTIFULLY!  (trust me I got a bunch!)


I hope you all have a FANTASTIC WEEKEND!!

Theresa