Tuesday, August 30, 2016

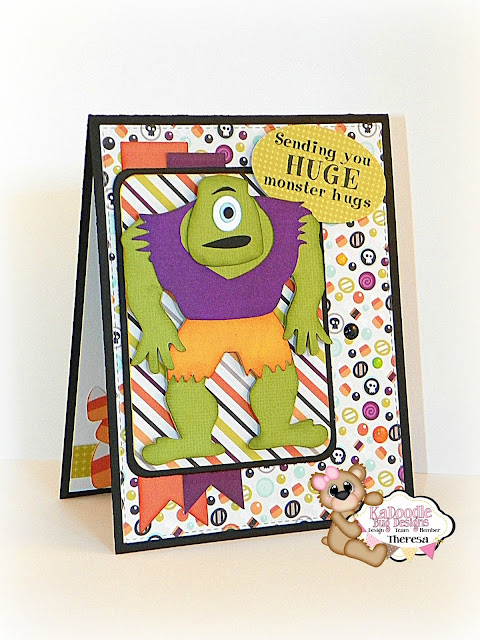
Sending Monster Hugs!!

Hello & Happy Tuesday Everyone!
How's your week going so far? Mine isn't
too bad! I'm looking forward to a nice 3 day weekend coming up!

Today, I've got a SUPER FUN Halloween card to show ya!
I'm using one of the "LAST CALL" SVG Files from
What does "LAST CALL" Mean?
 It means this will be the last chance you'll be
able to get this fun file - Melissa will be removing it from her store and
I think it's only 50¢ right now - what a steal!


I totally LOVE that Green Eyed Monster!! :)


-- Here's what I created to inspire you --


This is sooo CA-UUTE!!! :)


** Recipe for this card **

Cardstock - Stampin' Up, Bazzill, Sil. Adhesive, 
Georgia Pacific, American Crafts
Designer Paper - Echo Park (Halloween)
Candy Corn inside my card - Echo Park (Halloween)
MFT Wednesday Sketch #288
Green Eyed Monster - KaDoodle Bug Designs
Banners - Created in my Silhouette Program
Corner Chopper - We R Memory
Stitched Card Mat Die - My Creative Time
Sentiment - Pink by Design (out of Business)
Oval Punch - EK Success
Momento Black Tuxedo Ink
Doodlebug Sprinkles - Beetle Black, Limeade, Tangerine

Thanks so much for stopping by!!
Have a FANTASTIC Day!!!

Theresa

Monday, August 29, 2016

Joseph's Coat Birthday -

Hello & Happy Monday Crafty Peeps!
We are on the last few days of August!!!
OMGOSH! Where has the Summer gone?
Of course you all know.. I'm super excited
for FALL to begin, so I'm totally over Summer! LOL

Today, I wanted to share a card I made using a 
technique I just barely heard about - I'm sure some of you
have heard of this cool technique before - but not me!!! :)

It's called the Joseph's Coat Technique
I learned it from the group I'm in, over at
I joined this group a couple of months ago...
They teach all kinds of different techniques
and I thought.... WHY NOT? 
It's only $9 a month and they have TONS of 
Ideas & Techniques to show you... Some, I already knew
and tons more I didn't! I really get tired of having to search
a technique up on youtube... so I'm trying this place out
for now, since I can find all my info in one place... :)

**** (I DO NOT WORK for this GROUP) ****
I'm just letting you know where I get my info from... :)


Here's the Card I created using this Technique


I actually think it turned out pretty cool!


-- Recipe for this Card --

Cardstock - Stampin' Up, Bo Bunny, Georgia Pacific
Swiss Dot Embossing Folder - Provo Craft
Enamel Dots - Freckled Fawn, Eyelet Outlet, Teresa Collins
Scalloped Stitched Frame Die - Gina Marie (Firefly Crafts)
Ranger Round Blending Tool
Misti Stamping tool
Versamark ink
EK Success Powder tool
Clear Embossing Powder - Hero Arts
Marvy Heat Tool

ALL the highlighted items can be found at the


Here's how I created it --

I took a blank piece of White Cardstock and used the
assorted Distress inks and blended them up on my cardstock
to get the look I wanted - in this case colorful! :)
then I used my powder tool to add powder all over my colorful cardstock piece before I started to stamp - I took my cardstock & placed it in my Misti tool - then decided on my stamp placement - inked up my stamps with the versamark ink - then stamped on top of the blended cardstock - I did this 2x's to make sure I got the versa mark ink coverage I wanted - I then added some clear embossing powder and heated it up - You can tell it was complete when the clear embossing powder turned the words glossy looking - THEN the FUN part - I took the Black soot distress ink and covered the entire piece of cardstock in it - so now it's completely black - then I took a towel and wiped the black ink off - which gave me the cool effect you see on my card - The Embossing resisted the Black ink and now shows the cool mixture of distress inks I used underneath -
I then used my Stitched scallop frame to cut out what I wanted -
attached it to a pink card mat backing - added some dimension to it, so it could POP up on top of the Dotted dry Embossed background - attached it all to a Grey 4 1/4 x 5 1/2 card base - then added some Enamel dots for some extra fun!

If you've NEVER tried this technique - I encourage you to give it a shot! I thought it was interesting to say the least - 

Thanks for reading ALL the way through my crazy long post!

Have a FABULOUS DAY!!!

Theresa
Friday, August 26, 2016

So THANKFUL for you....

Hello & Happy FRIDAY Everyone! 
YAY! The Weekend is here yet again!
I do have some crafting plans for this
weekend - but not sure I'll get to them - Keep
your fingers crossed that I can find the time!!! :)

I thought I would show you one of my wood projects
I completed last weekend - I LOVE Fall, so making
Fall projects is just so much fun for me! :)


I really like how this Wood Piece turned out.... :)


- How I created this Project -

Plain Wooden Acorn - Local Wood Store
Designer Paper - Fall Paper from my Paper Stash
Orange and Green Flowers - Velvet Jewel Flowers (Maya Road)
Jute Twine - Papertrey Ink
Vinyl - Provo Craft
Sentiment - Silhouette Store (#40525)
Apple Barrel Acrylic Paint - Nutmeg Brown
Stampin' Up Chocolate Chip Ink for Shading
Mod Podge to adhere the paper to the wood base
Wood Glue to adhere Acorn topper to the Acorn
Hot Glue to attach the flowers & Jute Twine Bow


Thanks so much for stopping by -
I hope you ALL have a FANTASTIC WEEKEND!!!

Theresa

Wednesday, August 24, 2016

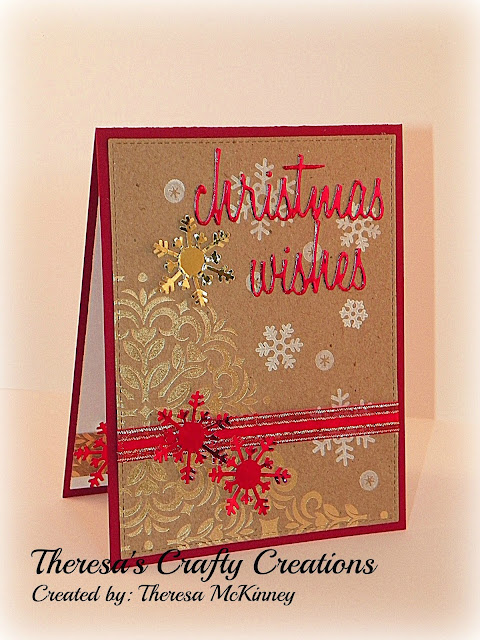
Christmas Wishes foil -

Hello & Happy Wednesday Everyone!
How's your week going so far? I hope it's been wonderful for you... 
I've been keeping busy myself and have been thinking about
re-organinzing my craft room (AGAIN) YIKES! 
It's one of those things we crafters tend to have to do
from time to time - I try to re-organize every quarter because
of the new goodies I purchase (I know you know what I'm talkin' about!)
But, I've been a slacker - and need to get it done soon... :)
How soon? Well... that depends on me... and how soon I want
to really get in there and fix it... maybe a week? maybe another 2 months!
Trust me.. it's starting to bug me.. so it may be very, very soon - 
But I do have some craft projects I want to finish first -

Anyway.... enough of my jibber jabbering! I thought I would
share a Christmas Card today, since I forgot to share it last week
as I try to make one new Christmas card every week - :)


I'm NOT sure how I feel about this particular Card - I had an idea
in my head when I started it - but not sure it was what I wanted -
And - the photo could be much better, but there was a LOT
of Glaring going on due to the foil that was used -


-- Recipe for this card --

Cardstock - Stampin' Up, Georgia Pacific, Bazzill Gold Foil, Open Cardstock Red Foil
Designer Paper - DCWV (Foiled Elegance Stack)
Christmas Wishes Die - TH Alterations (#660058)
Snowflake Stamps - Simon Says Stamp (Cute Snowflakes)
Moonlight White Brilliance Pigment Ink
Heating Tool
Stitched Card Mat Die - Die-namics (Blueprint #13)
Snowflake Punch - Martha Stewart
Ribbon - My Stash

As you can see by the picture, I added a strip to the inside of
my card along with a Foil Snowflake to round out the card -


Thanks for stopping by -
Have an AWESOME DAY!!!


Theresa

Tuesday, August 23, 2016

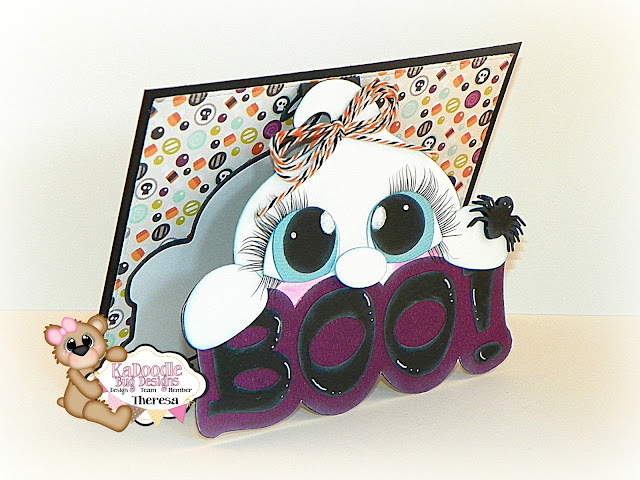
Spooky CUTE BOO!

Hello & Happy Tuesday Everyone!
Today, I've got a FUN Halloween card
to show ya - I'm using an ADORABLY
SPOOKY CUTE svg file from: 


This file is just soooo CUTE! I HAD to have it! :)


- Here's what I created to inspire you -


I told ya it was soooo CUTE! And of course what makes it even
cuter are those False Eyelashes!!! :)


As you can tell by the photo I welded it, to create a card base shape -
I then attached the back half to a regular 4 1/4 x 5 1/2 card base to make it more sturdy for sending in the mail -


-- Recipe for this Card --

Cardstock - Stampin' Up, Georgia Pacific, Bo Bunny, Bazzill
Designer Paper - Echo Park (Halloween)
Eyelashes - $ Store
Bow - Trendy Twine (Spiced Pumpkin)
Stitched Card Mat Die - Die-namics (Blueprint #13)
Recollections Opaque White Pen
Charmkin Cute Peek-A-Boo Ghost - KaDoodle Bug Designs
EK Success Pink Dry Chalk for the Cheecks
Memories (White) Dye Ink - for the shadowing
Silhouette Cameo - For Welding my design together


Thanks so much for stopping by today!
Have a FANTASTIC DAY!!!


Theresa

Monday, August 22, 2016

Distress Birthday -

Hello & Happy Monday Everyone!
I hope you all had a Fantastic Weekend! :)
It's my day to post over at the Firefly Crafts Blog
So I thought I would inspire you with a Birthday card!
We can NEVER have to many Birthday cards in our stash! :) 


- Here's what I created to share -


I thought this would be perfect for a Male or Female -
You could never go wrong with a Gender Neutral card!


- Recipe for my card -


Cardstock - Stampin' Up, Georgia Pacific, Canson Watercolor
TH Distress inks - Blueprint SketchPeacock Feathers, Salty Ocean
Versa mark Ink
WOW Primary Ebony Embossing Powder
Marvy Heat Tool
Misti Tool for stamping
 Sentiment - Cakes & Candles  (Avery Elle)
 Ranger Round Blending Tool
Wonky Dies - Gina Marie Designs

I did the embossing first , then added my distress inks - 
I took a towel to wipe off the ink that was still on the sentiment
then I sprayed water on it - then pat it dry
I sprayed some more water - then pat it dry to get the look I wanted
Once that was done & completely dry
 I die cut it with the wonky stitch die
 I felt it needed a little somethin' somethin' so I added 
some sequins with glossy accents -
I did add a strip to the inside of my card as well along
with a couple more sequins


You can find ALL the Highlighted Products


Have a Fabulously Crafty Day!!!

Theresa

Friday, August 19, 2016

Pumpkins 5¢

Hello & Happy Friday Everyone!
YAY! The Weekend is Here! I've got some Wood
projects I want to get started on this weekend!
I haven't made any in quite awhile -

Soooo, today's project is a Wood Piece I made
this past week to add to my Fall Home Decor!


I think this turned out so lovely! I miss doing my Wood Projects! :)


- Here's how I created it -


The Wooden Pumpkin Kit came from a local Wood Store (Plain)
I painted it with Apple Barrel Acrylic Paints - Harvest Orange, Nutmeg Brown, & Palm Leaf
I inked the edges with some SU Chocolate Chip & Pumpkin Pie Ink
The Papers are assorted from my stash of Assorted Fall Papers
I created my Burlap Bow with my Bow It All 2.0 
I got the Ribbon from Walmart in the Floral Section
The Wood & Burlap Leaves I got from Michael's last year - 
I inked them up with some Stampin Up Pumpkin Pie Ink & Old Olive Ink and attached them to the bow
The Orange Rectangle Gem I've had Forever - it came from Imaginisce
I hot glued the bow to the wood piece 
I had to use some Wood Glue to attach the sign to the back of the
triple pumpkin
Beige Vinyl is from Provo Craft
Decorative paper was attached to the wood base using Mod Podge


Thanks so much for stopping by!
Have a SUPER CRAFTY WEEKEND!!!

Theresa

Wednesday, August 17, 2016

Firefly Challenge - Beach

Hello & Happy Wednesday Everyone!
It's time for a Brand NEW Challenge over at

Today's Challenge is SUPER EASY!!
It's a Beach Theme/ Under the Sea
And I know ALL of you can create something wonderful for it!


These are the Rules for our Challenges:

1. You MUST use a Stamp or Die
(or some other main component of your project)
That CAN BE FOUND IN OUR SHOP

2. You MUST upload a photo of your creation
to the proper album on our Facebook Page before
Midnight EST. time August 30th

3. HAVE FUN!!!


We always have a Prize too!!!
 So, I would LOVE to see my crafty friends playing along with us -

The Challenge is on our
I hope you guys will join that group as well...


- here's what I created to Inspire you -


I made this card for my son to give to his friend
that he visited back in June - He went down to visit him
for a week the beginning of Summer and I thought a little
"Hello" happy mail was in order now that School is back
in session... :)


-- Info on my Card --

Cardstock - Stampin' Up, Georgia Pacific, Spectrum Noir Ultra
Designer Paper - Doodlebug
Tim Holtz Distress Inks - Scattered Straw, Frayed Burlap, Tumbled Glass,
Salty Ocean, Blueprint Sketch
Ranger Blending Tool
Surfer Boy Image - Your Next Stamp (Kai from Hawaii)
Copic Markers - E000, E00, E11, Y13, Y15, Y17, Y19, YR 14, 
YR16, YR18, G14, G17, BG02, BG05
Scallop Stitched Frame Die - Gina Marie
"Hello & Friend" Stamps - Avery Elle (Ellie)


-- Products can be found here --


Thanks so much for stopping by!!
Have a Crafty Day!

Theresa

Tuesday, August 16, 2016

Foxy Fall Hello -

Hello & Happy Tuesday Everyone!
I hope your week is off to a great start so far!
Today, I've got a lovely Fall card I want to show you -

I'm using the Adorably CUTE


This set is one of my FAVORITE sets and I
LOVE a lot of them! :)


- Here's what I created to inspire you -


OMGOSH... I just LOVE how this card turned out - The New
Echo Park Paper is AWESOME!!! :)


- Products used on my card -

Cardstock - Bazzill, Doodlebug, Stampin' Up
Designer Paper - Echo Park (Fall is in the Air)
Sakura White Gelly Roll Pen - For Eyes & Doodling
Woodland Sitting Fox SVG - KaDoodle Bug Designs
Stitched Banner Dies - My Creative Time (Ribbon End)
Stitched Zig Zag Die - My Creative Time (Tag Dies Layers)
Dotted Circle Die - My Creative Time (Bunch of Circle Dies)
Lg & Sm. Stitched Mat Dies - My Creative Time 
(Stitched Rectangle Frame)
"Hello" Arrow Die - My Favorite Things (Arrow Greetings)
Sequins - My Craft Spot (No Longer in Business)


Thanks so much for stopping by!
Have a Wonderful Day!

Theresa

Monday, August 15, 2016

You're one of a Kind....

Hello & Happy Monday Everyone!
I hope your weekend was awesome &
you're ready to start a new week! :)

Today, I've got a Sweet Flamingo card I
would like to show you - Karen over at Little Scrap Pieces
has made a bunch of adorable Cards using this Flamingo Stamp set
from Lawn Fawn and I kept telling her I have this stamp set and
will have to make something with them - Her cards were soooo cute!
So I FINALLY got around to putting at least one of the Flamingo's
on a card! I've had them colored for awhile - :) Just slow at
putting them on cards! hahaha


- Here's the card I created -


I really like the sweet scene I created using my distress inks -


- Products used on my card -


Cardstock - Spectrum Noir Ultra, Georgia Pacific, Bazzill, SU
Designer Paper - Doodlebug
Flamingo Image - Lawn Fawn (Flamingo Together)
(Brother Scan N Cut) - To Cut out my Flamingo & Sun
Grass & Firefly Images - Lawn Fawn (Dad & Me)
Chameleon Markers - Bubble Gum & Cool Grey
Ranger Blending Tool
Distress Inks - Faded Jeans, Chipped Sapphire, 
Mowed Lawn, Peeled Paint
"Sun" & Sentiment Stamps - Simon Says Stamp (Happy Day Card Kit)
Cross Stitched Rectangle Die - My Favorite Things
Stitched Circle Die -  My Favorite Things
Scallop Circle Die - Jaded Blossom (Fall Dies)
Black & White Twine - We R Memories
Tiny Sequins - Simon Says Stamp


Thanks for Stopping by!
Have a FANTASTIC DAY!!!

Theresa