Friday, February 28, 2020

I'd pick you!

Hello & Happy Friday Everyone!
Can you believe February is just about over?
WOW! We are LEAPING into SPRING! 

That means a little warmer weather (yay) and
Spring Break! My Spring break is in 2 short weeks
which means I'll be going to the other house for an entire 
week without the internet! UGH!
We'll be painting the house (at least that's the plan)
And then fixing a bunch of stuff as well - Lots to do I tell ya!

In the meantime, while I wait for Spring Break to arrive
I thought I would show you another card I made with the
We R Memory Retro Glam Card Kit -


My card doesn't look like the original card design 

If you look at the very bottom on the Card kit, it shows a
long card - well... this is my version of that card!


Mine is an A2 card size (4 1/4 x 5 1/2) and I added
other layers and a totally different sentiment
I used a stitched rectangle frame die from MCT
 clear wink of Stella on all the flowers - 
The Cardbase is a dark grey cardstock from Papertrey ink


I hope you ALL have a Wonderful Weekend!!

Theresa

Wednesday, February 26, 2020

Retro Glam....

Hello & Happy Wednesday Everyone!

While I'm still struggling to create, I managed
to make 8 cards over the weekend using an
old card kit that I had just sitting around - 


I made a card with this kit a long time ago
and since I'm not feeling super crafty I thought this
might help jump-start some Mojo! 

The kit says you can make 8 cards, (which you can see them on the cover) 
 since I already made a card with this kit and made 8 more over the weekend
and have at least 2 possibly 3 cards left to make with
this kit... I think you can get at least 12 cards completed using
any card kit -

I never use the sizes they offer like 5x7 or the large square card
size of 5 1/2 x 5 1/2 - I use the extras from those types of
designs to create more cards with - I also prefer to use
my own cardstock for the card bases - which pushes
more cards out of the kit as well - 

These first 3 cards are the first ones I made
trying to jump that Mojo Juice!, So they
are more like the ones in the picture on the card kit -


I used Sahara Sand Stampin' Up Cardstock for my card bases


This is a long card sized at 3 1/2 x 8 1/2
The only changes I did from the kit are I added only 1 pink scallop
(the kit shows 2) and I added a faux stitch swirl from the bird to the sentiment
I also added Clear wink of Stella on the Birthday chipboard letters and
the chipboard birds wing and belly -
I also added some Fun Foam for Dimension


This one was supposed to be a 5 x 7 card but I cut it down
to be an A2 Size (4 1/4 x 5 1/2) and I also didn't add the
4 pink dots the card kit shows - I just didn't like them -
I used my favorite My creative time Stitched rectangle frame die
and added some fun foam for dimension
I also added some Clear Wink of Stella on all the green flowers, 
it gives it a nice sparkle!


This one I changed ever so slightly - I actually love the design of this one -
The original design has that background leaf as the card base -  But I used
my Sahara Sand Cardstock and added a Bazzill green cardstock layer 
then cut down the leaf design then added the rest - I had to trim the
scallop pieces and green strip because mine wasn't the size of the original -
I added clear wink of Stella to the Hoot letters and to the pink bow on the owl
I also added some fun foam for dimension and the stitched
rectangle frame dies are from My Creative Time


I hope you have a WONDERFUL DAY!!!


Theresa

Monday, February 24, 2020

Silent Night...

Hello and Happy Monday Everyone!
Have you ever just NOT felt like Crafting? 

Well, that's been me all week...
 I've been checking out your blogs to try
and get inspiration... and you guys
are really rockin' some awesome designs
and yet I still feel like Naaawwww... 😌

When we returned from our trip
back from the other house is when 
it started... I mean, everything over there
is getting done slowly, but still getting done...
Then I come back home only to sit here
doing nothing... GRRR!

I don't know if it's the stress of everything or what?
I did make myself do some crafting yesterday -
I have some old card kits still in their packages and
thought maybe I should try that! So, that's
exactly what I did... I followed a couple of cards
before I finally made some designs without
looking at the ideas they had - I ended up
making about 8 cards with at least 2 more left to do -

I think I'm gonna try a few more of the kits in
hopes it'll get me motivated... We shall see...

In the meantime here's a holiday card I made 
a while ago using foil! Yup... I still have several
projects sitting here complete with foil on them!! 


The images, Sentiments are from the Silhouette Store
I used my laser printer to print them out


I used deco foil on both cards and put them through my Laminator


I used Stitched Rectangle frame dies from My Creative Time,
and Fun Foam for added dimension
The blue and Gold Metallic Cardstock is from Making Memories


This is what the inside sentiment looks like, the sentiment
is also from the Silhouette store - I did one in the gold and the other
in blue to match up with the fronts of the cards - 

They both look so elegant and I can't wait to send them out for Christmas!


If you guys have any Mojo vibes you'd like to
share... please send them my way! 😁


Have a Beautiful Day!!

Theresa

Friday, February 14, 2020

Amazing Person....

Hello & Happy FRIDAY Everyone!
Or should I say... HAPPY VALENTINE'S DAY!!
Either way, it's a 3 day weekend for me, which
means I'm working at the other house this weekend! 

I left last night, so I could be there today...
It means I have to return early since I didn't
work today... which stinks but I have nobody
to do my job, so I do what I can! (Wink Wink)

Anywho... As I told you last week, I don't really
do anything for Valentine's Day, usually, I make a
Shrimp & Lobster dinner for us just because I can, but
otherwise, it's just another day in my book! And since I'm
not actually home, I probably just order a pizza! hahaha

I know I make lots of foiled cards so I thought today
I would change it up for you - 


Besides having a bunch of foiled cards -
 I have several Yupo Alcohol Ink designs done that need to
be placed on cards, so I made these 2fer cards!


Cardstock - Neenah Solar White, Yupo, DCWV Shimmer
Assorted Lucy's Cards Gems, Fun Foam
Stitched Rectangle frame dies - MCT
Crazy Stitched Die - Impression Obsession


Large HELLO Word Die & Sentiment - MFT
Tiny Heart Punch - EK Sucess
Banner Die - MFT
Assorted Alcohol Inks


I'm wishing you all a FABULOUS 
Valentine's Day & Weekend!!


Theresa

Wednesday, February 12, 2020

Second Foil Quill Post...

Happy Wednesday Everyone! I'm back with
another Foil Quill Project! I really hope you guys
don't mind all the foil cards I've been sharing...
I really enjoy playing with all the different ways
you can add elegance to your card projects
and foils are definitely up there! :)

So, there are 2 cards and they are Christmas cards!


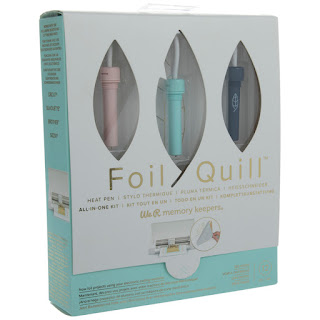
As you know I just got the Foil Quill kit and I bought extra Foil Quill colors at
my local Tuesday Morning, so I thought it would be fun to try using different foiled
colors on a card! When I use my Laser Printer and heat foil with
my laminator, it's really hard to get different colors - especially this close together
on a project - So having the foil quill really does help with those types of details!


I started out by finding an image in the Silhouette store (#208106)
I chose to use the BOLD PEN Tip this time and I had to
go to Sketch and enlarge my image then fill it in with the
checkered pattern again, then I used the .05 spacing and then
shrunk it down to fit on a card front -

What that does is "fill inside" the outline -
Most SVG's have an outline, and if you want to "color"
the inside with foil, you need to use the Sketch fill first
otherwise, it won't color inside - 
Here's a Youtube video showing someone using this technique
with the Foil Quill - Solid Fill


I used the Red foil first and it did the 2 trees and the 1 swirl, then when it was done
I used the Gold Foil which did 3 trees then I removed it and
then I used the Green foil to finish off the last 3 trees and swirl

I made 2 of them at the same time, so it took a while to create them -
Your machine is doing all the work and getting all the details
into each image - So you need to have patience which I don't
always have but watching this work flawlessly on
both cards made me very happy - It was only my second try
using the Foil quill - I could never get this foiled with all
3 colors with my laser printer and heat foiling, so you can
imagine the massive details having the quill can provide - 

I used Neenah Solar White Cardstock, Making Memories Gold & Red Cardstock,
MCT Stitched Rectangle Frame dies, The Sentiment is from MFT,
and I used Fun Foam for added dimension


Have a BEAUTIFUL DAY!!

Theresa

Monday, February 10, 2020

Long Story, Elegant Foiling...

Hello & Happy Monday Crafty Friends!
How the heck was your weekend?
I hope you all had a chance to do something fun!

Me? Well, it started out by adding a new driver
to my computer! Earlier in the week, my computer
was kind enough to warn me that my old
hard drive was about to go out... Weird? I know!

So, I called my husband and he suggested that I
upgrade to a Digital hard drive. So Amazon Prime
to the rescue and a new hard drive arrived, thank goodness
it was easy to install and I was able to clone ALL my files
from my old drive to the new one... And the kicker...
My computer runs sooooo much better now! Who Knew?
Certainly not me! hahaha

While I was shopping at Amazon (for the driver)... I happen to run
across a crafting item, I had been wanting since last year -
So, guess who bought it? ME!!! LOL
So I spent some time playing with my new tool
and I have a card to show ya using it - 


I know, I know another foiled card! But guess what tool
I used to make this card? The FOIL QUILL!!! EEK!!!
Look at the fine details of that image! I was impressed!


I have been wanting it since I saw it at CHA last January.
Of course, I wasn't a fan of the price point at the time (99.00)
But I happen to walk into a Tuesday Morning last week and they
were selling the individual pens for $20 apiece, so I started
to investigate the price. Then I forgot to check around until
I walked into a local Walmart and they had the kit for $64.00!
I was like... WHAT? So, instead of buying it at the store, I went home
and started searching online and funny thing... Walmart.com
is selling it for $44.98! WTH? $20 cheaper than the store???

So then I went to Amazon since I needed a Hard Drive anyway and
they were selling it for the $44.98 price as well... And you know I like
a good deal, so I bought it! Just a side note - Tuesday Morning
also had the Foil Quill Foil Rolls that are $9.99 selling for $4.99
so I bought a bunch of different colors to go with my new tool!

So once I got my important stuff done - (Hard Drive, Laundry, cleaned the house)
I sat down to watch a few youtube videos on how to use
my new tool with my Cameo 3 - After all that, I jumped right in
to make this card my first project with my tool -

I used the light blue pen ( Regular point) The pink pen is the
(Fine Point) and the Dark Blue Pen is the (Bold Tip) -

I grabbed an image from the Silhouette store (#313896)
and I did a TRACE of the image before I went to foil
I tried to make 2 of them, but since it was my very first
time trying it out the first image was off. center... like by a lot and
the second image was perfect or close to it!
I used the Sketch pen setting and set my force to 3 
and kept the speed to 10

I used a portable charger I have to heat up the pen
and away it went - When I revealed the foil image
I could not believe the details! Stunning in person!

So then I wanted to add the sentiment and again
I went to the Silhouette store and got (#10893)
and that was a little trickier since I wanted to
"Fill in" the gold foil... 

Let me just start by saying THANK GOODNESS for
Youtube videos that helped! 

I enlarged my THANKS Word then
I went into "Sketch" and I grabbed the
Checkered image (That's probably not the right name of it)
But anywho, I filled the word with that image and changed the 
spacing to .05 then shrunk it down to fit - 
(It's like filling inside the word) 

Once that was done
I placed the Thanks were I wanted it under the floral design
and added the gold foil on top before sending it
thru to my cameo -  I left the settings the same as
before and then peeled away the foil to reveal
the lovely gold word -


I really love the way this turned out - and I have another
card to share with you (Well 2 more) cause
it was fun to practice and learn how
to use this new tool - It's another great way
to foil and you all know I LOVE to Foil!!! 

I used Neenah Solar White Cardstock, Making Memories Pink
Foiled cardstock, MCT Stitched Rectangle Dies, Fun Foam,
Gold foil from We R Memory Foil Quill Kit
Fushia Foil From We R Memory Foil Quill 12" x 96"


If you guys have any questions?? Feel free to shoot
me an e-mail and I'll be happy to answer your
questions as best I can!


Have a FABULOUS DAY!!

Theresa

Friday, February 7, 2020

Christmas Magic...

Hello & Happy Friday Crafty peeps!!
It's the weekend again! YESSS!!!

One week left till Valentine's day!
Do you guys do anything for Valentine's day?
Me? NOPE! 
I mean I always do something for my family as a whole! 
I tend to make a shrimp & lobster feast -
Shrimp & lobster is so cheap during this time, so I
buy it and make them a nice meal with it -
But I don't go all out for my hubby or anyone like that...

I can tell him I love him whenever the heck I want!
I don't need a special day for that! hahaha

Anywho - I'm jumping holidays and sharing another
Christmas Card I made! tehehehe


2 weeks ago I showed you these snowmen cards right HERE
and while I was making them I decided to make a Santa one as well!

The Santa die is from SSS
The paper is a 6x6 pad in my stash
the elegant stitching die is from Penny Black
And I'm not sure who the sentiment is from -
I didn't write anything down and I'm not about to go
through my very LARGE Christmas Stamp stash! 😁
I used some black glitter cardstock for Santa's belt and
a piece of gold shimmer cardstock on it as well 


Wishing you all a Beautiful Weekend!!!

Theresa

Wednesday, February 5, 2020

Dim the Light....

Hello and Happy Hump Day Everyone!
I've got a foiled card to show ya -

I told you guys I had several foiled card fronts
ready to be placed on cards... well this is one of them...


I'm using the Polka Dot Orchard Digital Stamp sets called:


I added some clear lucy's cards gems to the flower centers
The foil is copper color (I think?)
I used a Stitched heart die, Stitched Banner die, & a
Stitched Rectangle frame die 
The heart was die cut out of a piece of vellum - 
and of course, I used a piece of fun foam to add dimension!


I think the sentiment is so beautiful! 💗


Have a FABULOUS DAY!!

Theresa
Monday, February 3, 2020

Happy Heart Day treats!

Hello & Happy Monday Everyone!
I have a quick post for you today!


I made these quick Valentine's treats for a friend of mine's girls -
I used some felt owl stickers from Micheals and the topper
dies are from Jaded Blossom -
The Pattern paper is old SU Papers
and I can't remember where the "Happy Heart" Stamp is from
I threw in some yummy kisses and there ya go! :)


Have a Beautiful Day!

Theresa