Friday, March 29, 2019

Being You Foil...

Hello & Happy FRIDAY EVERYONE!!! EEK!
It's the Weekend and the LAST WEEKEND of MARCH! 
WHAT???
Can you believe it? We have beautiful Spring Weather and
we're heading into April!!! I can already feel the
Summer HEAT Creeping in where I live!! UGH!

While I'm pondering the last of the month and the weather this weekend
I thought I would show ya another lovely Foiled card I made!!


 Isn't this so Pretty????

I honestly can't remember where I got the floral design from -
I want to say my Silhouette Store... But Not Sure? I actually
didn't save the details for this one! Oops! 
 I do know it was printed out on my Laser Printer and I made several
copies of it for foiling! 

The Foil on the flowers is the Deco Foil Amethyst Watercolor (It's Beautiful foil)


I used a Lawn Fawn Stitched Square die to cut out my floral design
The Scallop Square Die is from Gina Marie and I cut that out with some
lovely Black Foil Cardstock I didn't know I had! NICE! 😁

The "Thanks" die & Sentiment are from MFT (Kind Thanks & Twice the Thanks Die)
I die cut the "thanks" 3x's and I added adhesive to both sides of the
top die layer of the word so I could add some Minc Silver Foil over it - 
I just rubbed the silver foil across the adhesive word and tada!! 

I decided I wanted a little more showing under the square foil scallop design
so I grabbed another Lawn Fawn Die called Windy Backdrop
just to add a little more interest - This die just leaves etching marks
no cutting was involved with this die - I attached the whole
card front piece to a black card base and added some Lucy's Cards Jewels
to finish off my Thank You card!

I struggled to get a good shot of this one, that's why I'm showing you 2
pictures... It's so elegant up close with the pretty shades
of purple and silver along with the black & white...


Thanks for stopping by today!
I hope you ALL have an 
AMAZINGLY BEAUTIFUL WEEKEND!!


Theresa
Wednesday, March 27, 2019

Totally Grateful Foil...

Hello & Happy Wednesday Crafty Friends!
I'm back today with another foiled Card!

This time it's a THANK YOU, Card!
I didn't want to bombard you with ALL
my Christmas Foiled cards! (Wink Wink)


This is soooo PRETTY in Person!! Eek!

The design is from the Silhouette store again! (#72192)
It's called the Chevron heart framed background /Card Panel
It's actually a Die cut that I made into a Print -

I sized it in my Silhouette Program then I added
Black as the color fill for the chevron design and line color
Then I clicked the No cut so I could just print this out

Normally I wouldn't need to click the no cut if I'm
just printing something out without using my Silhouette
machine - But I did add other images to my paper that I
needed my machine for so this step was a must for me -

Anyway... I grabbed the Minc Hot Pink Foil and put this
through my Your Story Laminator and Bam! Look at the beauty!!

The Thank You Die (cut out 2x's) is from MFT (Twice the Thanks) 
and the sentiment is also from MFT (More Essential Sentiments)
which I heat embossed in white

I added some Clear Wink of Stella to the Thank you die
and added some Clear Gems from Lucy's Cards
My card front is popped up with some White Fun Foam
for a little added Dimension! 
The Banner die is from Lawn Fawn (Everyday Sentiment Banners)

See! I can make more than my Christmas Cards with Foil!
😂😂😂😂😂😂😂😂😂


Thanks for stopping by!
Have an AWESOME DAY!!!

Theresa

Monday, March 25, 2019

Merry Christmas Tress...

Hello & Happy Monday Everyone!
I hope you're all well rested and had a great weekend!

Today I'm gonna share some more Foiled Christmas cards!
I told you guys I'm ADDICTED to foiling and I really think
most of my Holiday cards this year will be foiled! 

Warning: A little Photo Heavy!


As you can Imagine.. trying to take photo's of Foiled cards is
really, really hard! So I tried my best to share the best photo's I had... 
Honestly, nothing looks better than the real thing in your hands!
I LOVE how they all turned out!


The Design is from the Silhouette store (#104200) It's a Print N Cut

I chose to use Rainbow Deco foil on this one along with a 
Red Foiled Cardstock as the background


I think this one is my FAVORITE out of all of them!
It's all PINK! A nice Non-Traditional color!
FYI - I'm NOT a fan of Pink I'm more of a Blue Colored girl
but this Bright Pink Foil really does look amazing with a matching
Pink Foiled Cardstock behind it -

- I used Minc Hot Pink Foil on this one -

All the foiled cardstock colors are from Making Memories
Remember I told ya I found it in my stash of 12 x 12 paper and forgot
I even had it... Not anymore!! LOL, They're getting used! 😁😁


Here's the other set I made... I decided NOT to use any gems on these
cards - I felt the foil needed to take center stage

I used 2 Stitched Rectangle Frame dies from MCT and
 I used White Fun Foam to make them all Pop!
ALL the white Cardstock is Neenah Smooth Solar White


I used Minc Red, Green & Teal Foil on these cards


And the Merry Christmas sentiment on these two cards are done with 
Minc Gold Foil


I have to say I like using the Deco Foil way more than
the Minc Foil... But they both get the job done!
I got a ton of the Minc foils at Tuesday Morning awhile ago
at a really good price, so that's why I have them

I normally use my Your Story Laminator but I
was having issues recently so I  borrowed my 
Moms Royal Sovereign Laminator -

Again both machines work great! The problem I thought I
was having was thinking I wasn't getting enough heat with my
Your Story machine - NOPE! It was MEEE!!! Not my machine!
User Error (Go Figure) 😉

So I've gone back to using that and returned 
my mom's laminator to her...
And everything is foiling just great cause I have
more Foiled cards to show ya! 😂😂😂


Thanks for stopping by!
Have an AMAZINGLY AWESOME DAY!!!


Theresa

Friday, March 22, 2019

Geo Border...

Hello & Happy, Happy Friday Everyone!
I made it through the first week back! YAY ME!

You know that means we only have 9 more weeks
of School left! YESSS That's right!!!
I'm counting down now! LOL

Okay, so today I'm using another "BORDER STAMP SET"!
This one is from My Creative Time called (Geo Borders)
It comes with 3 different borders but I chose to use the
cool Triangle design - - 


This card just makes me HAPPY! 😁

I used Mustard Seed, Carved Pumpkin, & Picked Raspberry Distress Oxides
with my triangle border stamp and 
I used a piece of that black & white Striped emboss design I made last week - 
I think the black & white makes the yellow, orange, & pink really POP!

Then I took a piece of white scrap cardstock and colored it with the
same 3 distress oxide colors and then I die cut out the Stitched balloons
to match - The Balloon dies are from Craftin Desert Divas
The Sentiment is from Dreamerland Crafts (Birthday Sentiments)
I added Black/White We R Memory Twine behind the balloons
and added some itty bitty Clear Adhesive gems to each balloon.


Another card for another staff member - 
I'm really on a roll with these! LOL


Thanks for stopping by!
I hope you ALL have a FANTASTIC WEEKEND!!


Theresa

Wednesday, March 20, 2019

Beary Surprised!

Happy, Happy Wednesday Everyone!
How's your week going so far? Mine
has been busy since we started back to school this week...
I guess that means my week will fly by and the weekend
will be here before I know it! Or at least I hope so! 😂😂

I'm back with another "Border Stamp"!
This time I'm using the stamp set called
CARD BORDERS from My Creative Time


Isn't this just darling? I love that adorable bear!!

Okay, so I stamped the card borders stamps in Pink, Yellow, Red, & Orange
then I die cut my card front with a stitched rectangle die also from MCT

Then I found that adorable bear image in my Pre-Colored bag stash and thought he
was the perfect fit! It's from MFT (Beary Special Birthday) so is the sentiment!

I also wanted a little more design on my card without taking
away from the colored border so I grabbed my Lawn Fawn Stitched Trail dies
to add a little somethin' somethin'
I popped on a couple of Lucy's Card's gems and there ya go! 😃


Yup... another card for the School Staff! Yay Me!!


Thanks for stopping by!
Have an AWESOME DAY!!

Theresa

Monday, March 18, 2019

Fabulous Hippo...

Hello & Happy Monday Everyone!
Is it a Happy Monday? I might beg to differ
on this one... I have to return to work today...
So, I'm gonna say NOPE! It's not a Happy Monday! 😏

But I'm sure you guys think it's an AWESOME Monday...
So, I'm gonna go with that! 😀

I had a great week off from work, it went toooo FAST!
But I think we ALL say that! 😉

We went to check out some property to see if that's
where our "forever home" maybe one day soon and
went to visit some old friends and Family too! 
It was a very nice laid back kind of week -
Those are my favorite kinds of weeks!

I have another THEME kind of week for ya -
This week I decided to focus on 
"BORDER STAMPS"!

Today's Project was created using the
Fiskars Mini Geo Borders Stamp set


I was going for an Ombre background 
so I used 3 different shades of Pink Ink and 
the arrow border stamp that's in the Fiskars set - 
I placed it in my Stamparatus and just moved my cardstock
up as I changed the pink shades from light to dark -

Once I did that I had to find an image to match my background -
Luckily for me... I have a ton of images I've colored over the last couple of years
sitting in a large baggie waiting to be used -
The Sweet Hippo image is from CTMH (Safari Ballet)
and I used my Zig Watercolor pens to color her up

I used a cross-stitched heart die in grey cardstock
to place behind my hippo
I also used my favorite stitched rectangle die from MCT
The sentiment is from PaperTrey Ink called (Signature Greetings)
I added some clear lucy's cards gems and placed my card front
on a Mambo Pink card base

I think it turned out so sweet - 😊


Thanks for stopping by!
Have a FABULOUS DAY!!!

Theresa

Friday, March 15, 2019

Brush Strokes Birthday...

Hello & Happy (Sad) Friday Everyone!
I say SAD because that means my vacation is over!
and  I'm gonna have to go back to work on Monday...

I certainly didn't feel like this week went by slow enough!
Ooh, Well... I guess I'll just share another card with you instead
of thinking about it! :)

Still using the SSS Brush Stroke Messages Stamp set
and with today's card, I'm using another
Brush Stroke Stamp set called -
Large Brush Strokes From Scrappy Moms (No longer in Business)


I really like the bright bold colors the Distress Oxides offer!

Okay so, to start with I took a 6x6 Diagonal Stripes background Stamp from MFT
and stamped it onto a piece of White 6x6 cardstock in 
Versafine Black ink - Then I used Clear Embossing powder over it
then heat set it so I could have my own black & white paper - 

I used a strip of it on this card, then I took the Large Brush
Stroke Stamp from Scrappy Moms and stamped it off to the side
of a piece of white card stock in purple, blue, green, yellow, & Orange

There was a gap in between each stamp, so I pulled out the thinnest
Brush Stroke Stamp from the SSS stamp set and filled in the
gaps with a different shade of the same color families -

Then I die cut out the Happy Birthday Circle Frame Die (MFT) 2x's in black 
cardstock and laid it over my colorful design - I placed a piece of
Fun Foam behind the card front I created, then attached it to
another White Card Base - I added some Lucy's Cards
Jewels in similar colors on my design and now it's
ready to go for another Staff member at School!


Thanks for stopping by this week!
I hope you ALL have a FANTASTIC WEEKEND!!!


Theresa

Wednesday, March 13, 2019

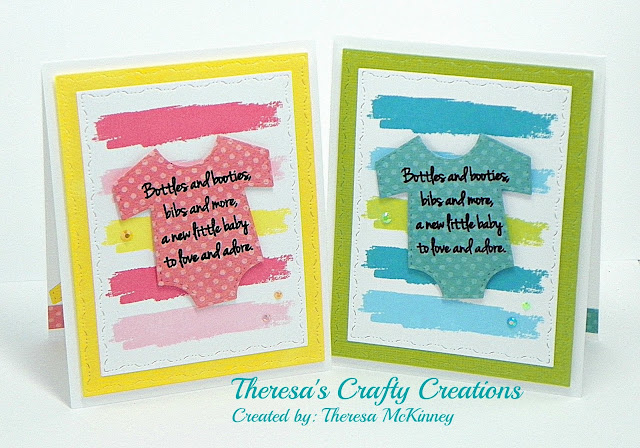
Bottles & Booties..

Hello & Happy Middle of the week Everyone!
This is a PRE-SCHEDULED Post since I'm
on Spring Break right now - :)

I hope you're all having a great week so far!
I'm back with another Card using the SSS
Brush Strokes Messages Stamp set


I thought some Baby cards would be FUN to make!!


I'm using my Distress Oxide inks to stamp up the backgrounds - 
I used my Stampin' Up Stamparatus on all my cards this week
It was easy to position my stamp so that I only had to move my card
stock Up or down, depending on what I was trying to make!

The Elegant Stitching Rectangle Frame dies are from Penny Black


The Baby Onesie Die is from Lil Inkers - I love the stitching
and the Sentiment is heat embossed on the onesies
I'm using a My Craft Spot Stamp set (they're no longer in business)
The Jewels are from Lucy's Cards and the dotted paper
is Bo Bunny -


Thanks for stopping by!
Have a Beautiful Day!


Theresa

Monday, March 11, 2019

Birthday Rainbow Strokes...

Hello and Happy Monday Everyone!
While I'm on vacation I thought I would
Pre-Schedule my Weekly Theme Posts!

This week's theme I'm focusing on 
one Stamp Set - I got this Stamp set 
from an older Simon Says Stamp Card Kit

As you can imagine, I got the kit and then
ooh'd & aah'd at it when it arrived... then into
a drawer it went! Like ALL the other ones I have -

I no longer get the SSS Card kits because I
haven't used the other kits I got from them and got
tired of wasting money every month on a kit
I may or may not ever use! :)

I'm sure I'm not the only one out there who has done that!
It's okay if you don't want to admit it... I get it! Wink Wink

So.. this is the Stamp set I'm using this week -


I LOVE the look of a Rainbow on a card!

So I pulled out several Distress Oxide Inks and 
stamped one of the Brush Strokes across my card -

The Sentiment & YAY word die is from MFT
The Stitched Rectangle Die Frame is from My Creative Time
Assorted Jewels are from Lucy's Cards
I popped the card front up with some Fun Foam before
placing it on my Black Card base - 


Perfect Card for another Teacher at school!
Have a Marvelous Day!!


Theresa

Friday, March 8, 2019

Fiercely Awesome Shaker...

Hello & Happy Friday Everyone!
YAY! The weekend is here which also
means SPRING VACATION!!! Whoot, Whoot!

And, YES I do have some plans! We will be
going out of town so I won't be online as much...

But... before I head out to enjoy my Break
I thought I would share 1 last Shaker Card with you!

I'm using Stamps and a Die that I haven't used before!!
Way to go Theresa! It's about time I use them!!! :)


Isn't this Darling? Now I'm NOT a Cat Fan - I'm allergic to cats
so I honestly don't use them on projects - I prefer Dogs (Sorry guys)

But, When I saw this Image from Little Acres (Unicorn Dreams)
I just HAD to have it - Of course when I got it... Did I use it? NO!

So, now I'm rectifying the situation and putting this little
cutie to some good use! :) I colored her up with some of my
Stampin' Blends Markers and cut it out with my Scan N cut Machine -

The Sentiment is another Stamp set that I HAD to have
from MFT called (Fierce Friends) and I like the
way the 2 of them go together on my card!

The Die Set I'm using to make my shaker is from
PaperTrey Ink called Shaker Shapes Square
YES! Another Die I had to have but never used until now!

I also pulled out some of my 12 x 12 papers from
Basic Grey (Porcelain) YUP! Something else I had to have
but never used because it's too pretty to use!

Man... I got issues! haha haha
 I'm so glad that I realized that
it's important to use the stuff I already have -
I've actually managed to save me some money the last couple of
months by not shopping for more stamps & dies! YAY ME!


Thanks so much for stopping by this week!
Have an Awesomely Good Weekend!!!!


Theresa