Tuesday, January 9, 2018

Die Cuttin Diva's - Guest Designer

Hello & Happy Tuesday Everyone!
Today, I'm Honored to be Guest Designer over at 


The Theme this week is PENGUINS!!!

I Adore Snowmen, & Penguins, so I was super
excited to be asked to play along with this challenge --


-- Here's what I created to inspire you --


I've been working on some Winter cards to send to some
of my crafty friends in the Mid-West & Back East
I'm sure with the Snow & Cold they're having that 
they might appreciate a little Happy Mail - 😘

I haven't cut out an SVG file in quite some time
 so it was fun to put this little one together -
I'm using Doodlebug DP 
 The Penguin SVG File is from KBD (Toasty Penguins)
I stamped the face with a Peachy Keen Stamp
(Happy Penguin Couples Faces)
The Stitched Rectangle & Banner Die are from MFTStamps
The Small Stitched Rectangle Die is from Craftin Desert Divas
The Stitched Scallop Border Die is from My Creative Time
and the Stitched Circle Die is from Simon Says Stamp
The Small Stitched Heart dies are from Ebay
The sentiment was from My Craft Spot (No longer in business)
Assorted Cardstock used - SU, Bazzill, Georgia Pacific


Now that you've seen what I've created - Head on over to
Die Cuttin Divas , join in the fun and create something
with this Theme! Make sure to leave some Blogging Love
for ALL those Fabulous Design Team Members
over their - They work really hard to make FUN
Challenges for you & ME! 


Have a FABULOUSLY CRAFTY DAY!!!

Theresa

Monday, January 8, 2018

Baby Wipe Tutorial --

Hello & Happy Monday Everyone!

This weekend my AWESOME Crafty friend
Georgiana from Carson's Creations
asked me if I would do a Follow up
Tutorial on the Baby Wipe Method Card I Made 

So, I said SURE I could --
Now, I know there are some videos
on how to do this - But I only watched
1 video and it was from a Stampin' Up Demo.
from Aug. of 2017 - 

When she did the Baby Wipe Method -
She used a Stamp with this method
Because that's how you're suppose to do it!

I tried it and didn't like my results with my stamp
and it was TOTALLY USER ERROR!
I should have used a Solid image stamp
Which, well I DID NOT!! LOL

And that's when I thought could I do this
on my water color paper?? Sure Enough &
I got some really NEAT RESULTS from it --

Soooo -- Here ya go - I hope it helps someone out!


I started out with Baby Wipes, 4 Distress Inks and some Tim Holtz Water Color Paper
Now - You can probably use ANY water color paper (I just like this type)
And YOU MUST use DYE INK - It's what works with this technique
So any dye inks you have will work! :)


I took 2 Baby wipes and layed them on top of each other


I folded it in half


Then folded it one more time - to look like this!

You do this so the Baby Wipe acts like an Ink Pad


You only need a few drops of each color - So You can see I only
used 3 drops of the Faded Jeans Color


So this is what I ended up with after adding my inks -

So, in the video I watched, she used a Solid Stamp and just went
straight down into the ink with her stamp - (dabbing it)
It was a straight Up and Down motion - the whole point
was to get your stamp wet using the different colors
But if you dip your stamp in several areas - you'll just have a 
muddy mess -- (I hope that made sense) 


Because I didn't like how my image was - I tried this instead --
I picked up my baby wipe and started to dab at my watercolor paper
Using the different colors -- it turned out neat -- 


Then I added some Water - I wanted my colors to blend a little more


Then I wanted my Background to shine so I sprayed on some
Frost Shimmer Mist -- (NOTE) -- My photo is not in the right steps -
I Sprayed my Shimmer frost first (which is why it doesn't look like my
Colors blended together) - Again User Error!!! LOL


After letting my Paper Dry (I took a Heat tool to it for the Pictures)
I didn't do that the first time I tried this - I actually let it sit off to
dry til the next day - But You can Totally Use your Heat Gun
I know you wanna get this done! LOL 

Then I splattered Some Brushed Pewter Stain on my Background
I thought the Blues & Purples needed a bit of Silver!!!


AND This IS my Final Product!! Everything is blended and actually 
Sparkles in person!

Now another (USER ERROR) I noticed for Myself IS
I like to use the Smooth side of this Water color paper
and what did I do??? The Textured side! GRRR!

In Crafting there are NO MISTAKES! Just Happy
Creative outlooks! :)


As you can see - I Made 2 backgrounds with that same Baby wipe
The second image is where I used the Smooth side of the 
watercolor paper - See the difference? 
They both turned out great, but I'm a SMOOTH Side Gal!! LOL

I do hope you guys try this and let me know if you did --
I would LOOOOVE to see what you create --

Here's the Link to the video I watched


Big HUGS and Have a Great Week!!!

Theresa

Saturday, January 6, 2018

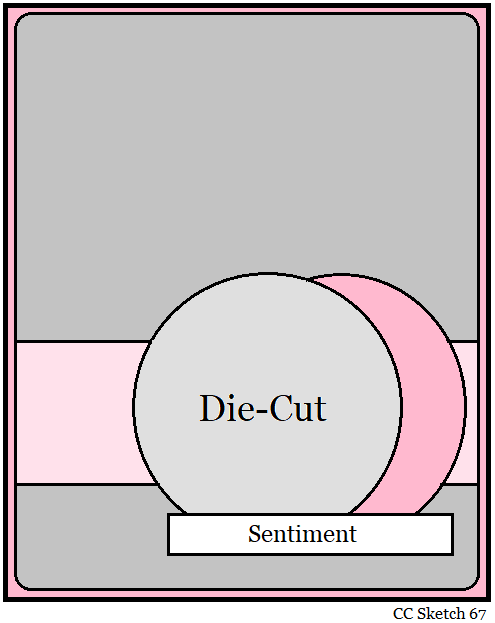
Let's Party Birthday Sketch....

Hello & Happy Saturday Everyone!
I know I don't normally post on the weekends
BUT... Die Cuttin Divas has a Great
Sketch Challenge going on this week that I 
really wanted to play along with --

Here's the Sketch --


 I really like the design and decided to use this
for my Local Monthly Card swap group cards this month
the Theme is Birthday - So here's my card --


I totally love this card! I made 6 of them for my Card Swap this month
and I can honestly say, that I'll probably be using this fun sketch again!

Cardstock - Recollection 110lb., Bazzill, Georgia Pacific
Designer Paper & Cake - Simple Stories (Let's Party)
Stitched Rectangle Die - MFT
Stitched Circle Dies - SSS
Stitched Banner Die - MFT
Sentiment - Papertrey Ink (Birthday Basics)
Big Shot, Misti Tool, Memento London Fog Ink

Make sure to link up to this Challenge by Monday -
I believe a New Challenge Starts every Tuesday!!

Have a great Weekend!

Theresa

Friday, January 5, 2018

SumMore Fun - Mood Board Challenge #19

Hello & Happy Friday Everyone!
Today... starts another FUN Challenge over at: 

 YAY! I know how you
guys enjoy a good Challenge!


Our Mood Board is -- TRY SOMETHING NEW


 You can use the Mood Board or go by the Theme
or Use the color combo or Use all 3!!! You don't have to use
a stamp from SumMore Fun if you don't have one!


All the rules for this fun challenge are RIGHT HERE!


Here's what I created to inspire you --


I decided to try something NEW to ME! I've NEVER EVER tried
the BABY WIPE Technique - So, I watched a couple of videos
and then felt good enough to try it myself - I started with a stamp --

I really didn't like how it came out so then I thought???
Hey, I can just use this baby wipe on some
Watercolor paper!! Right?? Maybe?? Let's see....

And so I did use the baby wipe method on some watercolor 
paper, I used Distress Re-Inkers (Peeled Paint, Dried Marigold,
Worn Lipstick, & Scattered Straw)
Dabbing my Baby wipe all over the watercolor paper
then proceeded to spritz some water on the watercolor 
paper - to help mix it up a little more
and the background you see here is what I got!

I ended up liking how neat it turned out - so I dried
my watercolor paper completely and then sprayed it with some
Sheer Shimmer Frosted Spritz - I LIKE SPARKLE!!
Then I needed a little bit more so I added some
Splatters of Distress Spray in Tarnished Brass
Once that all dried, I REALLY LIKE my background
I thought it was so NEAT!

So, then I thought what else can I do???
So I decided to TRY ANOTHER TECHNIQUE!! EEK!

I've NEVER EVER Embossed on ACETATE Before -

and I bought some acetate that's designed for
heat embossing but never tried it until now!!

So I took that AWESOME HAPPY BIRTHDAY STAMP (2871-H)
from Victorine Originals and stamped it on some
Heat Resistant Acetate (Crafter's Companion)
using my Versamark ink, then using some
Super Fine White Embossing powder to cover over it -
shook off the excess powder
 then pulled out my Heat tool and away I went!

And it turned out so PRETTY! EEK! 
I didn't want to cover up my cool background so
I used a label shape die I had to cut out the
Happy Birthday Sentiment, then used that same
die to create a thin frame around the sentiment -

I didn't add anything else to my card, because I
thought all that color was so pretty and didn't think
I needed anything else to add!


Of course I did the inside of my card as well --


I didn't use any special techniques, but I used that
Pretty BEST WISHES Stamp from Victorine Originals
along with a flower & Gem from my stash!


I hope you guys can join us --
 I would LOVE to see what you create!


New to SumMore Fun Stamps??
Check out the SumMore Fun Stamp Store
SumMore Fun Blog
SumMore Fun Facebook Page

You can find me at these links 
Facebook - Pinterest


Thursday, January 4, 2018

Sending Warm Wishes...

Hello & Happy Thursday Everyone!
Today's my day to take over the blog at:
YAY for me... 🙌


Today I thought I would share a Wintry Card
I made to send to a crafty friend --


Even though Christmas is over, it's still nice to get HAPPY MAIL!
Especially now the Cold Winter months are setting in
for a lot of people - I'm sure this card will PERK her right
up and hopefully take her mind off the COLD Outside!!
Even for a little while! (wink wink)

I'm using a dark Grey Card base and a piece of DCWV Designer
paper that I had in my scrap pile --

I pulled a piece of Tim Holtz Watercolor paper out and
stamped it with The POST CARD STAMP, then I
Stamped the SNOWMAN WITH HAT STAMP --
I used Onyx Black Versafine ink -- 

I wanted to make a snowy scene behind the snowman, so I masked off
my Snowman and used the TINY DOTTED BACKGROUND
stamp for a snow effect -- Then I colored my
snowman with some Zig Real Brush pens

I decided to just write my own sentiment on the front
since this IS a "PostCard" style card! LOL

And then I added some Gems & Snowflakes to give it
a soft, girly vibe -- 


New to SumMore Fun Stamps??
Check out the SumMore Fun Store
SumMore Fun Blog
SumMore Fun Facebook Page


You can find me at these links 
Facebook - Pinterest


Thanks so much for stopping by!
Have a FANTASTIC DAY!!

Theresa

Wednesday, January 3, 2018

Oriental Trading - Love is in the Air...

Hello & Happy Wednesday Crafty Friends!
Our next BIG Holiday is just around the Corner --
VALENTINE'S DAY
So you know I gotta make quick
Sweet treats for my 5th graders using 
some FUN products from Oriental Trading


They are only 3" tall by 3 1/4" round, but they are the PERFECT
size to hold a few treats! - Did you know they carry YUMMY
Holiday candy as well?? - 
It certainly made it easy for getting everything I needed
all in one place -- The goodies I got to put in each pail


Here they are stuffed with all those yummy goodies! And there's still room
if I wanted to add more!


I needed at least 21 pails for my 5th grade class --


I wanted to make tags to go with each pail - So I got the
Valentine Owl Cards & Owl Valentine's Day Pencils
and made a hole at the top using a Hole punch
and I wanted to attach them using some Tulle in Pink & Red


The Sentiments on these owls are adorable!!! :)


And this is what they look like completed --
How CUTE! Right?? I think the kids will be excited to get these -


Head on over to Oriental Trading to check out the items used on my project 
and for other Seasonal decor items.  


Have a FABULOUS DAY!!


Theresa

This review is based strictly on my opinion.  I was provided the samples free of charge by Oriental Trading to provide my honest review.  No other type of compensation was received.  All ideas and opinions are my own.  

Monday, January 1, 2018

Besties International Guest Designer!

Hello & HAPPY NEW YEAR Everyone!
I'm Super Excited today as I'm Guest Designer

It's such a HUGE honor to be asked to play along with them -
The Challenge this time around is 
BABY, IT'S COLD OUTSIDE!!
So I created this sweet card to share with you --


I'm using one of the Besties Winter Wonderland images -
She was so fun to color - I printed my image out on some
watercolor paper and then sprayed my paper with 
Krylon Workable Fixatif - Since I have an inkjet printer 
I needed to spray my watercolor paper first (then let it
completely Dry) in order
for me to use my Zig Watercolor pens --

Once she was all colored, I used a Stitched Rectangle die
to cut her out - I then found some Doodlebug
Scrap papers that matched her and started to design my card -
I cut out some snowflake dies as well to tie
in with the theme and added a couple of Gems to
finish off my card! 

Thanks so much for stopping by today!
Please make sure to check out all of the other
They are AH-MAAA-ZING!

Have a Fabulous DAY!!

THERESA